Requirement Areas

In the last months, I’ve had many conversations in the LeSS community and in the current product I work in about Requirement Areas. From those discussions, I’ve discovered new ways of explaining them. Here, I’d like to share some of these.

What are Requirement Areas?

Requirement Areas is a grouping of items on the product roadmap used to create a view on the Product Backlog. This view helps us structure the teams accordingly.

Then what is the product roadmap? A product roadmap is a high-level view of the Product Backlog. In the LeSS books, Craig and I talk about items in the backlog that can have ancestors. Nowadays, I refer to items that have ancestors as “roadmap items”. Together they form a high-level view of the Product Backlog, which is usually referred to as the Product Roadmap. Requirement Areas is a grouping or categorizing items on the product roadmap that we use for structuring the work.

Why Requirement Areas?

The original reason for starting this grouping, which began about 20 years ago with the first LeSS Huge adoption, was to support the Product Owner in keeping an overview of the development and prioritization. By having a grouping, we can create a view of the Product Backlog according to this categorization and structure the teams and PO around this. This enables us to scale from roughly 8 teams to any size product development.

Requirement Areas also give other benefits since they help in facilitating multi-team events. An area is always between 4-8 teams, so the multi-team sessions always have a reasonable amount of people to use practices as mixed-up groups in multi-team Product Backlog Refinement.

How to create Requirement Areas?

Creating Requirement Areas is not hard. The hardest part is that they are different from structures that people are used to. To create them, you need to understand what the main functionality will be the focus in development for the next year(s): the product roadmap. When you have that, do the following:

  1. Group related items in the roadmap that are related to affinity.
  2. See if you can think of a name.
  3. Imagine how many teams would be required to work on these.
  4. If the number of teams is smaller than 4, go to step (1) and redo the grouping or combine categories.
  5. If the number of teams is larger than 8, consider splitting the category or revisit (1) and try again.

Notice: The key factor that defines an area is the number of teams working there because the purpose of areas is to structure the work. Never have areas smaller than 4 teams.

What are not Requirement Areas?

There are a couple of common mistakes when using Requirement Areas. The biggest one is to have small areas (smaller than 4 teams). This is resolved by adding two small ones.

Other common misconceptions are:

  • Confusing them with Product Areas. A Product Area is a grouping of functionality in the product and not a functionality in the roadmap. This difference is significant! Your product might have a large amount of functionality related to “financial reporting” but when you do not plan to build new functionality in financial reporting, then you would never have a Requirement Area for that. For creating areas, look at the roadmap, not the product.
  • Using the Product Architecture for creating Requirement Areas. A Requirement Area is a grouping in the roadmap, not a split based on architecture. When you split based on architecture and structure teams accordingly, that is referred to as Development Areas. These are not recommended because all the component team dynamics will manifest in development areas.
  • Requirement Areas are often viewed as separate Products. Organizations frequently transition from many small products to one large product when adopting LeSS. During this process, they often confuse Requirement Areas with what they previously called a Product. This situation aligns with the misconception (2) but is common enough to warrant explicit mention.

There is a lot more to say about Areas, but for this blog, I’ll leave it here. More in the next blog.

From Silos to Synergy - Our Journey to One Product Backlog with LeSS

In this episode, we have the privilege of having Mauro Sacchi, an esteemed leader in digital R&D at Wärtsilä, whose innovative approach and vast experience in transforming traditional industries into agile powerhouses.

I’m excited to share our transformation story at Wärtsilä, where we’ve embraced Large-Scale Scrum (LeSS) principles to break down organizational silos and unlock our teams’ full potential. This journey wasn’t just about implementing a framework – it was about fundamentally changing how we approach product development and team collaboration.

The Challenge: Fragmented Firepower

When I took over leadership of our digital R&D organization three years ago, I encountered two critical challenges:

  1. Inability to direct our firepower to the most valuable work - Our organization was fragmented into silos, with over 10 teams each maintaining their own separate backlogs.
  2. Human potential diminished by hierarchical structures - Brilliant people with advanced degrees in physics and mathematics were being treated as mere code producers rather than valuable contributors to product decisions.

Let me illustrate this with a real scenario: One team was working on something extremely valuable for a customer who had complained about our development not meeting promises. Meanwhile, other teams couldn’t help because they were bound to their own backlogs and priorities – even though those priorities were objectively less valuable.

The LeSS Revelation

Though I’d been a Scrum practitioner since around 2007, I hadn’t been exposed to LeSS until taking this role. When my predecessor mentioned the organization was founded on LeSS principles with a Spotify model, I did what any responsible leader would do – I studied up and enrolled in the first available training with Bas Vodde.

That training was nothing short of a revelation. It wasn’t about falling for a theoretical framework (I’m not easily lured by process-heavy approaches). Instead, LeSS addressed my two concrete problems through two powerful principles:

  1. One product, one backlog - A clear approach to prioritization based on customer value
  2. People at the center of value creation - Recognizing that human potential drives success

The Big Bang Approach

We decided to implement the change in one go rather than incrementally. Why? With around 10 teams, we needed a meaningful critical mass to truly make a dent in our agility. So we merged all previous backlogs into one and elevated the role of the product owner.

This created what I call “necessary friction” – the productive tension that forces meaningful conversations about what truly matters to customers. Many organizations avoid this friction by creating silos, but that’s a missed opportunity for value creation.

“When you start to question and challenge, especially when you put items in competition with each other, you create friction. In my view, that friction is absolutely positive – it’s a dialogue you need to have for proper product ownership.”

Product Ownership: Not for the Faint-Hearted

In a LeSS organization, product ownership is a serious role that requires making hard decisions. The product owner isn’t just a requirements analyst – they must mediate across multiple organizations and customer requests to create one prioritized backlog.

This isn’t about being “nice” or popular. It’s about having the courage to say “no” or “not yet” to stakeholders, which can be politically challenging in a large corporation. Sometimes you need to compromise, but the focus must remain on maximizing value.

In our context, we have a product owner who owns the product we develop, while product managers from various organizations process customer requests to this product owner. Our product isn’t sold standalone – it’s part of a bigger ecosystem of services, which adds complexity to these relationships.

Unleashing Human Potential

Perhaps the most rewarding aspect of our transformation has been seeing our people flourish. In traditional industrial settings, software teams are often treated as IT service providers who simply code what they’re told. But in our world of maritime and energy equipment, software has become a critical engineering discipline that should sit at the same table as mechanical and electrical engineering.

This represents a massive cultural shift for corporations that don’t have software in their DNA. It means elevating software engineers to work alongside other disciplines to solve problems together – that’s true product development.

The results? Teams taking ownership, caring about the work they do, and helping each other regardless of their comfort zones. When it clicks, it’s a pleasure to witness.

“I see teams with excellent positive dynamics because they embrace the simple principle that we are doing product development. The success of my team is the primary objective for value creation, and I do whatever it takes to help that team succeed and deliver value to customers.”

Not a Walk in the Park

I want to be transparent – this journey hasn’t been easy. Some individuals don’t want to work in an environment where more is demanded from them. Some truly just want to code and be told what to do. We’ve been adamant that people belonging to teams need to do their best to make the team successful, even if it means working outside their comfort zones.

We’re also bridging two cultures – the software domain and the mechanical world – which operate at different speeds and often involve different generations. The youngsters need to respect the deep domain knowledge of experienced mechanical engineers, while the mechanical engineers need to recognize software engineering as a distinct profession requiring its own expertise.

The Long Game

Creating this culture takes time. While there are quick wins, building an organization with this mindset is a long-term journey. We’re far better than we were three years ago, but we’re still learning and growing.

For organizations considering a similar transformation, remember that you need to play the long game. The necessary friction will never (and should never) completely disappear – if it did, that would signal a return to silos and disconnection.

Final Thoughts

If you’re considering implementing LeSS in your organization, I’d recommend the training not just for product developers or coaches, but especially for organizational leaders. The principles of LeSS are fundamentally about designing organizations to succeed from both human and structural perspectives.

And if you’re in the middle of this journey already, remember: don’t give up. It’s worth it.


  • Mauro

Podcast with Ben Maynard and Mauro Sacchi

Listen to the podcast, below, or here at the Product Agility website

LeSS Simulation - Create A City Guide

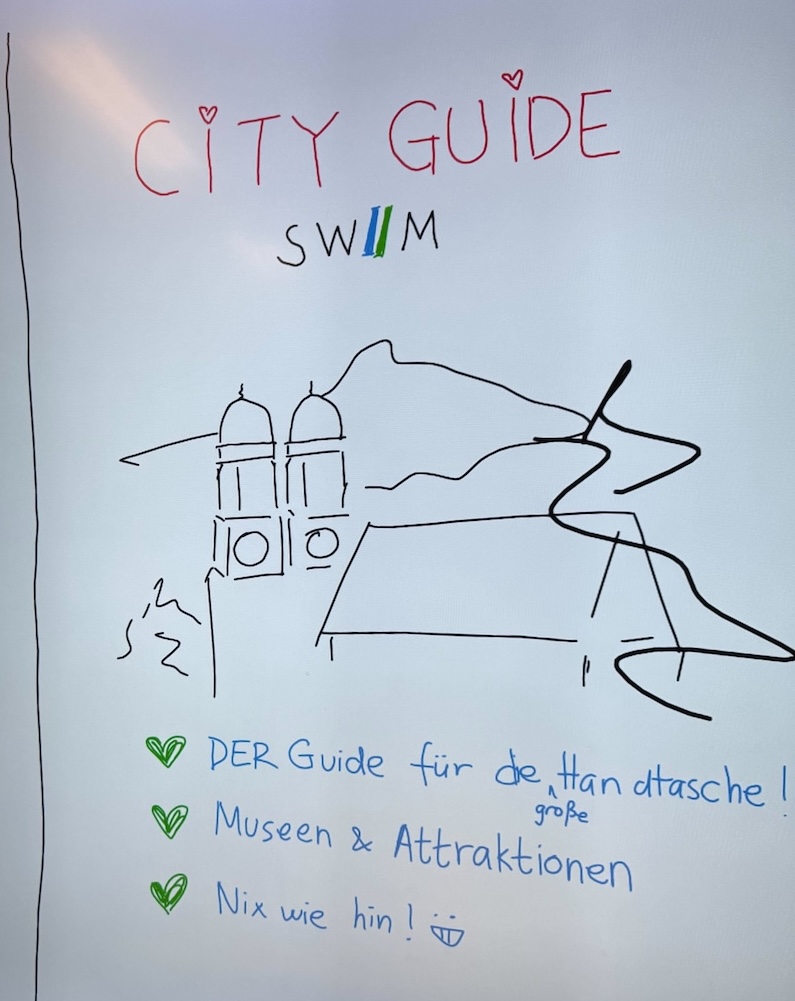
The LeSS City Guide Simulation is an interactive, hands-on activity designed to help participants experience the dynamics of multiple teams working together on a single product.

In this updated version of the Nexus Zoo simulation, the focus is shifted to a practical project: creating a city guide for the city where the training is taking place. Unlike the Nexus Zoo simulation, this exercise incorporates events typically seen in LeSS adoptions, such as a Self-Design Team Workshop and Multi-Team Refinement, to better simulate LeSS dynamics.

This activity helps participants understand how multiple teams collaborate to achieve a shared product goal, offering insights into the challenges of scaling Scrum. It is usually conducted before introducing the events in LeSS to highlight the differences between LeSS and Scrum.

city-guide

Materials Needed

To run the LeSS City Guide Simulation, you will need the following:

  • Colored voting dots (green, red, blue, yellow)
  • Large post-its
  • Colored A4 paper
  • Pens and markers
  • Transparent binder and puncher
  • Stopwatch or timer

Step 1: Self-Design Team Workshop

The simulation begins with a Self-Design Team Workshop, where participants form their own teams. The trainer provides colored voting dots representing key skills needed for the work:

  • Green Dot: Good knowledge of the city
  • Red Dot: Good drawing skills
  • Blue Dot: Beautiful handwriting
  • Yellow Dot: Tripadvisor on the phone

Each participant selects dots corresponding to their skills, making them visible on their name tag. Teams are then formed with 4-5 people, ensuring a balanced mix of skills across all teams.

Step 2: Multi-Team Product Backlog Refinement

Once teams are formed, the Multi-Team Product Backlog Refinement event begins. The Product Owner (PO) — who could be the trainer or, preferably, a co-trainer — presents the product goal: creating a local city guide and getting feedback on it as soon as possible. The initial items for refinement include:

  1. Cover Page
  2. Must-See Attractions
  3. Museums
  4. Restaurants
  5. Hidden Gems
  6. Current Events

The PO uses large post-its for each of these items, presenting them in the order above. Items are distributed for refinement, with one item given to a group of 3-4 participants, which should be a mixed group across teams.

The goal of each group during refinement is to create:

  1. A suggested list of items (e.g., top 5 attractions)
  2. A layout of the page (what it should include and where - eg. drawing of the attraction, map, etc.)

After a time-boxed refinement session, all participants walk around the room, and each group presents their work. A second round of refinement may follow to add further details if needed.
At the end of the Multi-Team PBR, the PO collects the post-its with the most interesting items (e.g. Must-See Attractions, Museums) to create the backlog.

Step 3: Definition of Done (DoD)

The Product Owner presents the Definition of Done on a flipchart or large post-its, covering the following:

  • One page per item
  • No two consecutive pages of the same color
  • One integrated product
  • One common copyright at the bottom center of each page
  • Clear handwriting; no grammar mistakes

Step 4: Sprint Planning

Sprint Planning follows, during which the PO presents the top backlog items and asks which team will take each item, one by one. The list will usually look like this:

  1. Cover Page
  2. Must-See Attraction 1
  3. Must-See Attraction 2
  4. Museum 1
  5. Museum 2
  6. Must-See Attraction 3
  7. Museum 3

The teams take as many items as they think they can complete in the given time for the Sprint.

Step 5: The Sprint

The Sprint starts, and the facilitator sets a visible timer. Teams use the time to complete an increment that meets the Definition of Done. The facilitator and/or PO should stay available to answer questions but avoid interfering unless needed.

Step 6: Sprint Review

When the Sprint ends, the Sprint Review takes place immediately, during which the completed work is inspected. The trainer sets a timer to keep the Sprint Review concise.

Step 7: Team and Overall Retrospective

After the Sprint Review, each team holds a Team Retrospective to discuss what went well and what could be improved. Afterward, the entire group participates in an Overall Retrospective, which includes the PO. This retrospective focuses on systemic improvements for the next iteration.

Common Challenges and Learning Opportunities

The simulation reveals several typical challenges, especially in the first iteration:

  • Lack of Communication with the PO: Teams often do not ask the PO questions about the product, such as the city guide title or copyright. In LeSS (like in Scrum), the PO is accountable for maximizing the value of the product resulting from the team’s work and should involve the team in product decisions while retaining authority over key decisions.
  • No Integrated Product: Participants often miss the tools for integrating pages (e.g., puncher and binder) and usually just present individual pages. In LeSS, it is important to have an integrated product that is handed over to stakeholders (e.g., customers) at the end of the Sprint.
  • Delayed Integration: Teams often integrate their pages into the binder only at the end of the Sprint, rather than continuously as pages are completed. In LeSS, continuous integration is encouraged to avoid last-minute issues and increase learning by observing what other teams are doing.
  • Insufficient Communication Between Teams: Teams often struggle to coordinate on items that should be consistent across all pages (e.g., copyright). In LeSS, team members are encouraged to coordinate directly by walking over and discussing whenever needed.
  • Unfinished Pages: If pages are incomplete at the end of the Sprint (e.g., drawing is not finished), the PO may add these items to the backlog for the next iteration.

Step 8: Debrief

The simulation usually involves at least one more iteration to allow teams to apply their improvement strategies and learnings. At the end of the simulation, a debrief session takes place to highlight key takeaways. Common debrief questions include:

  • What differences do you see between Scrum and the way you worked in the simulation?
  • What worked well in terms of communication between teams? What challenges did teams face in coordinating with each other? How did you ensure consistency across different pages?
  • How did delayed integration affect the final product?

Suggested Timings

  • Multi-Team Product Backlog Refinement (PBR): 8 minutes
  • Sprint: 10 minutes
  • Sprint Review: 3 minutes
  • Team Retrospective: 3 minutes
  • All other events: As long as it takes

Facilitation Tips

This section provides helpful tips for facilitating different parts of the simulation to ensure a smooth and effective learning experience.

  • Multi-Team Product Backlog Refinement (PBR): The PO should offer one item at a time (one item for a group of 3-4 people). Teams sitting at their team tables should decide how to split into different refinement groups. The PO can answer questions about what should be done but should not be overly involved in discussing details.
    In order for the PO to easily create the backlog at the end of the PBR, distribute large post-its and ask the teams to use them for the suggested attractions, museums, etc.
  • Sprint Planning: Ensure that instead of one team picking similar items (e.g., two museums), those items are distributed across multiple teams to promote cross-team learning and adaptability.
  • Sprint Execution: As a facilitator and/or PO, provide honest feedback on participants’ work but avoid giving direct guidance on how to proceed. Instead, encourage participants to think for themselves. For example, when asked about specific product details (e.g., copyright), respond with questions that prompt participants to come up with their own solutions. If asked how to coordinate that every team uses the same copyright, say, “I don’t know. What do you think?”

The LeSS City Guide Simulation provides an engaging, practical way for participants to understand the challenges and dynamics of multi-team Scrum, focusing on collaboration, handling dependencies, and continuous improvement.

Dealing with Spill-over Items

Introduction

Spill-over or carryover items are common in many teams. Unfortunately. Focusing on avoiding spill-over can have a positive impact on the team and team dynamics. This article provides insights into what spill-over is, why it’s important, how to prevent it, and what not to do to avoid it, along with strategies for measurement and improvement.

What does spill-over mean?

Spill-over refers to items that have been started but have not been finished at the end of the Sprint. Spill-over does NOT refer to items that were not started even though they were selected in the Sprint — these are sometimes referred to as items thrown out of the Sprint.

Consider the following scenarios:

  • A team picks up 4 items in Sprint Planning 1. They start all 4 of them, but then only complete (done) one of them in the Sprint. The other 3 they plan to continue the next Sprint. Spill-over is 3.
  • A team picks up 100 items. They start 1 of them and get it done. 99 of them they never started and are not completed at the end of the Sprint. Spill-over is 0.

A key point here is that spill-over does NOT relate to the amount of items a team selects during a Sprint. Hence, picking up less items to try to reduce spill-over is interesting but not likely to actually have an effect :)

spill-over

Why is spill-over important?

Spill-over is an important measurement for 3 reasons:

  1. Agility/flexibility. Ability to change directions every Sprint as there is a no work-in-progress point
    Originally, in Scrum, Sprints were described as small projects that are treated independently. In between the Sprints (and preferably, all the time) the product ought to be in a shippable state and there should be no work in progress so that the Product Owner can re-prioritize based on the current situation. Spill-over practically doesn’t give the Product Owner any choice, the same items need to be continued.
  2. Spill-over is caused by some team habits.
    There are not many good reasons to have spill-over at the end of the Sprint. The most common causes for spill-over is that (1) the team members work individualistic and have many items in progress at the same time, (2) this goes hand-in-hand with using spill-over as a buffer to stay within your comfortable knowledge area, to avoid learning, or (3) the items selected in the Sprint are too large.
  3. Spill-over suggests difficulty of working incrementally and a need to improve engineering practices.
    Within a Sprint, team members work in small incremental steps that are integrated and tested continuously. When the team members do not work incrementally, then the chance of spill-over increases due to integration problems or other hidden surprises.

How to prevent spill-over?

So, what are ways that teams prevent or cope with spill-overs?

  • Have this discussion within your team. As a team, you have the goal for your Sprint, which is either a Sprint Goal or selected items. How do you work on these as a team in a way that avoids having spill-over. Examples below.
  • Limit the amount of work-in-progress. The best teams I’ve worked with tried to work one item at a time during the Sprint. This dramatically increased team collaboration and learning. Spill-over became an exception.
  • When you try to limit the amount of work-in-progress, then you will end up working out of your knowledge area. That is not always easy. Adopt practices such as pairing or mobbing that will make it easier to learn together.
  • Tasks in a Sprint Backlog become coordination boundaries. Sprint Planning Two, in essence, is a software design meeting where the team talks about how they are going to implement the selected items. One outcome of that in-depth software design discussion is fine grained tasks. These enable the team to work one item at the time. Use the time in Sprint Planning 2 to talk, in detail, about the design. You’ll find you’ll learn a lot from that also!
  • Have a status check during the Sprint. Commonly this is 2 or 3 days before the end of the Sprint, usually at the end of the daily, where someone asks “Ok, we have 2-3 days left, how does it look? What can we (not) complete?” This is where the team can decide what to focus on to finish or what other actions to take.
  • Split items during the Sprint. When you discover an item is larger than expected or the item left is too big to fit in the rest of your Sprint, split it! It is fine to split items inside the Sprint. You update the Product Backlog, inform the Product Owner, and pick one for in the Sprint and the other goes back on the backlog. Obviously, this split is a customer-centric end-to-end split and not a task split (unless you had a task in the first place).
  • When you do have spill-over, take it in the Retrospective. How did that happen? How can we work differently to avoid this?
  • Split items in the refinement. I would recommend to split so that a team can take roughly 4 items per Sprint. No need to split as small as possible.

What not to do to avoid spill-over?

  • Pick up less items in a Sprint. I mean, this doesn’t harm, but it isn’t useful either :) Spill-over is not related to the amount of items you selected, so it will have no impact.
  • Take shortcuts to finish an item. When this happens you are solving something bad (spill-over), but introduce something much worse. Having high quality ‘done’ work is more important than reducing spill-over. Reconsider how you work as a team but do not rush. Also, when you see this happen in your team, please speak up as you and the rest of the team will need to deal with the result of shortcuts on the long-run.

Conclusion

Spill-over measurements can be good agile health metrics. In my experience, focusing on reducing spill-over always eventually has a positive impact on the team and team dynamics. Initially the focus on spill-over often triggers questions. These are great learning opportunities for you, take them serious and engage people in the conversation. Hopefully this post helps you and the teams in that conversation.

Credits

This article was originally written in Wartsila context and they allowed me to publish it here. Thanks to Jowen Mei and Ronald van Miert for edits to the post.